
Yoga for Tight Hips
- Angela Jean
- May 1, 2018
- 13 min read
Tight hips? You're not alone. It's very common due to a mainly sedentary lifestyle that most people lead nowadays (LOTS of sitting) and of course good 'ol genetics. But it's not a lost cause and you can help to slowly increase hip mobility with regular and consistent practice. Becoming Gumby isn't the goal though (nor is that healthy necessarily)...it's really more about releasing tight hips to improve overall comfort while doing very normal, day to day activities such as sitting and squatting. At the end of the day doing the simple day to day things you need to do to get around and live comfortably is far more important than ever being able to put your leg around your head. Trust me...as someone who was born with a lot of hip flexibility, I can say it has neither made me better nor happier in any way. But when I can sit comfortably (which after having a baby wasn't so easy for a while) I am truly grateful for my yoga practice.
The following poses can be done individually or as a complete hip opening sequence.

Baddha Konasana (Bound Angle Pose):
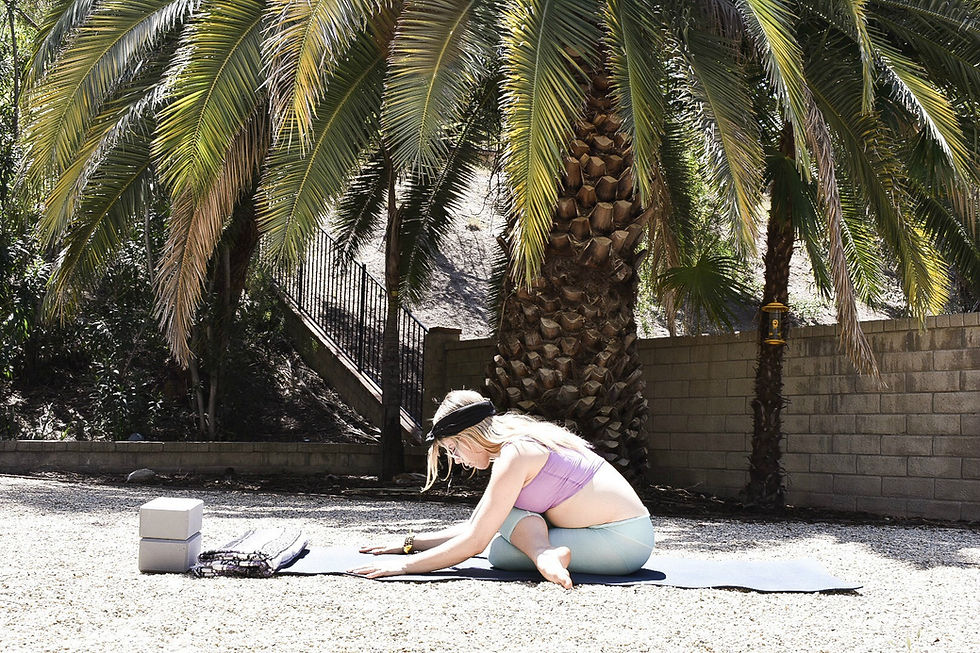
Sitting upright, place the soles your feet together and allow the thigh bones to descend towards the floor without straining or pushing the knees down. Have your feet as close to you as feels comfortable. The closer they are to you , the more intense the stretch will be. If your hips are super tight and you can't comfortably relax your knees down, then sit on top of 1 or 2 folded blankets. Feel free to place a block under each knee to decrease any strain on the inner thighs, hips or groin. You can also roll up your blanket like a burrito and wrap it around your ankles to get the same kind of support (pictured).
Ground your sitting bones down, hug the lower belly up and in and relax your shoulders down your back. Lift up through the sides of your waist and the crown of your head to maintain a nice, elongated spine.


Interlace your fingers around your toes, and either remain upright or fold forward depending on the amount of mobility you have in your hips. Because you're in external rotation at your hip joints, it's technically OK to round the spine slightly as you fold forward, however, I find that maintaining an elongated spine targets the hips a bit more effectively.
Hold for 1-5 minutes, focusing your attention on your breath, allowing the hips to relax a bit more with each exhale.

Gomukhasana (Cow Face Pose) without arm variation:
Sitting upright, stack the right knee on top of the left knee, lightly squeeze the inner thighs together and keep both sitting bones grounded on the floor. Try to have both heels equidistant to each hip.
Draw the lower belly in and lift up through the crown of the head, creating as much length in the spine as possible.
You should feel the stretch in the outer hips and glutes. To increase the stretch, fold forward, extending the arms onto the floor in front of you.
Hold pose for 1-5 minutes, focusing on sending your breath where you feel the most sensation. Switch sides and repeat.
Classically, Gomukhasana is done with a deep shoulder stretch as well, but since we are focusing on hip mobility, we are omitting this part. It's a precarious pose, even with the use of props, due to amount of shoulder rotation needed to be done properly. This variation is most safely done with an instructor one on one.

Virabadrasana 2 (Warrior 2):
Standing upright, take a wide legged stance and bring your arms out to your sides like airplane wings, palms facing down. Line your ankles up under your wrists, and make the outer edges of your feet are parallel to the outer edges of your yoga mat so that your feet are neither turning in nor out. Spread the toes and press the four corners of your feet into the floor.
Bend your right knee slightly and turn your right leg out from the right hip so that your right toes point to the front of your mat. For knee safety, always make sure your second big toe aligns with the center of your ankle which is aligned with the center of your knee cap.
Since the majority of us don't have ballerina like external rotation in our hips, it's necessary to angle the back toes, leg and hip in slightly to make up for the degree of exeternal rotation we lack in our front hip. If you have crazy open hips, don't angle your back toes in much (you may not need to at all, though this is very rare), if your hips are super tight, angle that sucker in and make sure your back toes and hip are pointing in the direction of the upper left corner of your mat.
Make sure the torso remains open to the side wall (even though the hips for the majority of students are slightly angled forward). This actually turns the pose into a mild twist in the upper body.
Lengthen your tailbone towards the floor, pull your lower belly up and in, relax your shoulders down your back and soften your front ribs down. Send your gaze out past your front fingertips establishing a drishti point (focal point).
Bend your front knee deeper, being mindful to not let it jut out past your front ankle or toes. The full expression of this pose is to have the front knee bent to 90 degrees, stacked above the front ankle, though this is not necessary if it doesn't feel right in your body... less is fine. Forcing a 90 degree angle could result in hip strain or a back knee injury. Be sure to keep the center of your knee cap in line with the center of your ankle bone and second big toe so that the knee isn't turning in or out.
Firm the outer edge of your back foot into the floor and press into the center of both heels to help engage the hamstrings as well.
Hold for 1-2 minutes (you probably won't be able to do much more than that as its a big quad strengthener and requires a lot of stamina to perform). Lengthen and deepen your breath as intensity builds in this posture. Be mindful of not letting the shoulders creep up by the ears and remember to relax your face and jaw.
Release, come back to center and switch sides.
This is a great pose to work 2 of the Bandhas (energetic locks). Mula Bandha (engaged pelvic floor), and Uddiyana Bandha (lower belly hugging up and in).

Parsvokonasana (Side Angle Pose) with block:
Start from Warrior 2 with the right knee bent and place a block on the inside of your right foot on any height (you can adjust the height as needed once fully in pose).
On an inhale reach your right arm forward as you bed a bit deeper into the right knee and place your right hand on top of the block. You'll probably need to scoot your back foot back a bit to widen your stance so that your front knee is stacked above your front ankle.
Reach your right arm up to the sky so that both arms form a straight line together. Root down through your bottom hand and extend up through your top fingers, keeping the chest open and spiraling up towards the ceiling. Lengthen your bottom right sitting bone towards your back left heel to lengthen the lower back.
Firm your bottom arm and knee together so that the bottom right knee neither collapses in nor opens too much (always keep the knee in line with the center of the ankle which is in line with the second big toe.)
Either keep the arm reaching up, or extend it out over the left ear, keeping the left tricep and pinky finger wrapping down towards the ground.
Root down through your heels and the outer edge of your back foot to create more stability in your foundation. You can look up towards your arm or down to the ground if there is any straining on your neck.

Classically this pose is done with the the bottom hand on the outside edge of the front foot. This is a deeper variation for the hips so placing the block or hand on the inside of the foot is usually preferable for most people.
Hold pose for 1-2 minutes focusing on long, slow inhales and exhales to help carry you through the challenge. Repeat on other side.

Prasarita Padottanasana (Wide Legged Forward Fold):
Start standing facing the side wall and separate your feet wide. Spread your arms out to the side like airplane wings, palms facing down, and make sure your wrists and ankles line up.
Spread all ten toes on the ground and make sure they point directly forward (not turning in or out). Lift the inner arches of the feet and hug your outer ankle bones in.
Take a deep breath in and as you exhale fold forward from your hips, maintaining the length in your spine as you fold. Place your hands on the ground directly under your shoulders (if your upper back rounds to do this then place your hands on 2 blocks placed shoulder distance on the floor so that the chest can remain open). If you do not need blocks and can keep the length in your spine then you may walk your hands back so that your wrists line up with your ankles and the top of your head lowers towards the floor. You can stay here, hook your big toes with your middle and index fingers, or grab onto the outer edges of your ankles.
Draw your shoulders up away from the floor to create more length in your neck and hug your outer hips in a bit to stabilize your pelvis. When in a deep forward fold like this the lower back (and ONLY the lower back) should be slightly rounded to maintain lower back health and resist over stretching the inner groins and hamstrings. This is also why we don't turn the toes in in this pose as doing so encourages the pelvis to tip forward anteriorly which is essentially cheating to get more depth. Depth that your body isn't eqiped to handle safely. Why is cheating like this bad? Because you can seriously injure your lower back and/or groins or hamstrings by forcing the body to go to a depth that's not meant for it. At least not at this time. Stretching correctly overtime will create healthy AND safe increased mobility.
Hold pose for 1-2 minutes. Close your eyes or keep your gaze gently fixated on one point. Focus your attention on the sound and feel of your breath.
After your last breath, slowly inhale and come back to a half lift with your hands on the floor or on blocks at shoulder distance. Pause for the exhale, put the slightest micro bend into your knees and then as you inhale slowly rise back up to standing.

Malasana (Yogi Squat):
Start standing and separate your feet about the width of your yoga mat (slightly wider than the hips). Turn your legs out slightly, being sure to keep your knees, ankle and second big toes in line on each leg.
Come into a squat. If your heels come off the ground you can either sit on a block, place a folded blanket under your heels or roll up your mat and place that under your heels for support.
Make sure that your inner thighs are hugging your outer ribs and place your hands at prayer in front of your heart. Use your elbows to help press the knees open and make sure your lower back is slightly rounded while the chest is open and lifted (same spinal alignment as in Prasarita Padottanasana, just flipped right side up).
Slightly draw the chin to the chest (jalandhara bandha) and breathe deeply into your hips. Hug the navel up and in (uddiyana bandha) and lightly engage the pelvic floor with each exhale (mula bandha).
Hold pose for 1-5 minutes (if doing a longer hold I would recommend variation with the block under the sitting bones so that pressure doesn't build up in the knee joints).
Focus on breathing low into your hips, releasing tension there with each exhale.
A good counter pose to do after this and before the next pose would be Uttanasana (Forward Fold) which you can find in my sequence for lower back pain.

Double Pigeon:
Start seated and stack one shin on top of the other shin, keeping your feet flexed to protect your knees and being mindful not to sickle the ankles. If the top knee is hiked up and can't comfortably descend, then place a folded blanket or a block under the knee to get the hip to relax. It can be helpful to place another blanket or block under the top ankle too.
Sit up tall and ground the sitting bones down into the floor. This may feel like plenty of sensation, and if it does then stay sitting upright. If you need more, then fold forward and walk the arms out in front of you on the floor. You can rest your head on a block or 2 blocks if needed.

Be mindful to not collapse the shoulders forward. Instead, widen the collarbones and lengthen the sternum forward. Try not to let your head hang here, instead, keep the neck in line with the rest of your spine (this is where resting on blocks may come in handy).
Hold pose for 1-5 minutes. Slow down your breath and try counting your breath to match the length of your inhales to the length of your exhales. For instance, try inhaling for 5 counts, and then exhaling for 5 counts. This kind of even breathing is calming to the nervous system, helping the body to get out of fight or flight (sympathetic response) and into a state of rest and relaxation (parasympathetic) which is helpful for reducing stress and getting the muscles, joints and deep tissues of the body to relax and open up.
After your last breath, sit up slowly and repeat pose with opposite shin on top.

Supine Hip Extension on Blocks:
There's really no Sanskrit for this pose, but it's an all-time favorite of mine. When stretching any part of the body you want to focus on stretching it in every direction you can. It's important to not forget hip extension when stretching the hips, as this helps to create length in the often tight hip flexors which clamp up from regular and excessive sitting.
Lay down with your knees bent and your feet flat on the floor, lift your hips up and slide 2 blocks on the medium height together under your tailbone (pictured). Make sure they are under the hard part at the base of your spine and that your booty ISN'T hanging off the edge of the blocks whatsoever.
Walk your feet out so that your legs are fully extended. You can either keep the feet flexed with the legs parallel to one an other, or you can let the feet and legs flop open in a more relaxed fashion, as long as this doesn't feel uncomfortable on your lower back. Keep your tailbone lengthening towards your feet to prevent over arching in the lower back. For most people the more relaxed variation is preferable, but if you have lower back issues you should keep the inner thighs rolling down towards your mat.
Relax your arms by your sides, palms facing up to the sky, and breathe deeply into your lower belly and the top of your hips. Hold for 1-5 minutes. A fun variation to take from here is to grab onto the blocks with your hands, walk your feet in and extend your legs up to the ceiling for a restorative inversion. This has nothing to do with hip mobility, but it's one of my favorite poses to practice. It's great for lowering blood pressure and getting proper blood flow back to the heart. Do not practice if you have glaucoma, high blood pressure, or cardiovascular disease.

Ananda Balasana (Happy Baby):
Start by laying down on your back. Bend your knees and bring the soles of your feet up to face the ceiling. Make sure your knees are slightly wider than your hips.
Grab onto the outer edges of your feet with your hands and gently encourage the knees to release down towards the floor. Keep your inner thighs hugging your outer ribs as you do this.
Press your shoulders down onto your mat and keep the lower back lengthened down onto the floor while the tailbone curls ever so slightly up off the ground (just a teeny tiny bit). Don't force the tailbone down onto the ground as it's often instructed in group classes. Doing so can cause very injurious over stretching to the inner groins, hips and lower back.
Hold pose for 1-5 minutes and send some long, slow, healing inhales and exhales to your hips and inner thighs as you hold. Feel free to close your eyes as you hold this pose and drop your awareness deeper into your internal environment and away from external distractions. We call this Pratyahara, which is the 5th step of 8 in the limbs of Yoga. It helps to inch us closer towards a deep, meditative state by removing the external senses and sharpening our inner awareness.

Supta Baddha Konasana (Reclined Bound Angle Pose):
In lieu of classic Savasana, I offer you this hip opening version to take instead.
Start seated upright and bring the soles of your feet together to touch. Allow the thigh bones to descend down towards the ground without forcing the knees down. If the knees don't descend comfortably, then place a block under each knee or wrap a rolled up blanket around your ankles (pictured).
Lay down onto your back and either extend your arms out to your sides with your palms facing up, or place one hand on your belly and one hand on your heart with your palms facing down.
Close your eyes and hold this pose for as long as you have time for. I would suggest at least 5 minutes but anything is better than nothing. If at any point you start to feel discomfort in your hips, you can release Bound Angel and just extend your legs on the ground for classic Savasana.
Allow your breath to be soft and natural. Close your eyes if that feels comfortable to you and bring your awareness to your breath. Notice how if feels as it flows in and out of your nose and mouth. Observe where it lands naturally...do you breath into your lower belly or higher up into your chest. Without changing anything, simply notice and observe. Allow every muscle and bone in the body to become heavy....relaxing more deeply into the floor with each exhale.
Soften the forehead and relax your eyebrows. Allow the cheekbones to become heavy and the jawbone to release. You can scan the body with the minds eye and consciously relax every part as you work your way down or up.
Allow your thoughts to flow in and out without getting fixated on any one particular thought. If you find yourself fixating, then simply notice that and come back to observing your breath.
It takes time to get tight hips to open up. It should be a gradual process that doesn't involve any forcing or straining. Practice this sequence about 3 times per week to start, and as you gain more mobility you can increase the amount of times you practice and the duration you hold each pose for. I encourage you to incorporate some light hamstring stretches and lower back stretches to counter some of these deep hip openers. Balance is key when it comes to your yoga practice and if you're focusing on one area of the body heavily, you want to make sure to incorporate counter stretches so that that area doesn't become strained or over worked.
Please comment below with any questions or observations you may have. I hope you enjoy your journey to greater hip mobility! From my heart to yours...happy stretching Loves!


So happy you liked it!
Great article on hip openers. Adding it to my TaiChi and Qigong practice.☯️💜🕉